Re: Perform differential photometry on an object moving across a field
Posted by karenacollins on Jan 27, 2015; 12:29pm
URL: http://astroimagej.170.s1.nabble.com/Perform-differential-photometry-on-an-object-moving-across-a-field-tp240p241.html
To allow control over the placement of the apertures between images in a time series, Multi-Aperture (MA) single-step mode must be used.
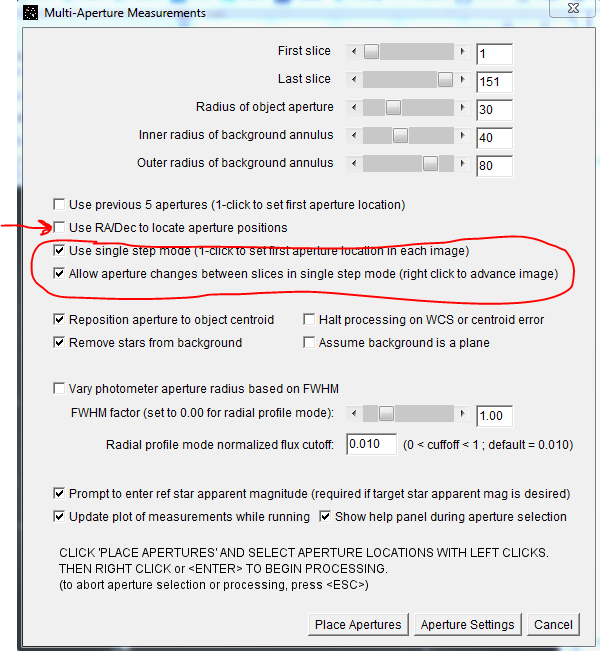
First a little background on the typical usage of single step mode: Single step mode allows the user to manually identify the location of the first aperture in a set of apertures with a left-click near the corresponding star in each new image. All of the other apertures are automatically placed at the same relative locations from the first aperture's location as recorded in the previous image. This capability handles cases when the images are not aligned as a result of poor telescope tracking or from slightly different telescope pointings in image sequences gathered over multiple nights. These "unaligned" image stacks can also be processed automatically if they have been plate solved by using the MA option "Use RA/DEC to locate aperture positions". However, the locate by RA/DEC feature should not be used when tracking a moving object since MA will attempt to place the aperture at the same RA/DEC location in all images and will result in the aperture not tracking the object.
Now back to how to manually perform differential photometry on a moving object: Open the image stack and start MA, which will display the setup panel shown below.
1) Make sure "Use RA/DEC to locate aperture positions" is deselected
2) Enable "Use single step mode..."
3) Enable "Allow aperture changes between slices..."
4) Optionally enable "Prompt to enter ref star mag..." if desired
5) Press "Place Apertures"
Using the 5 aperture example in the post above:
1) Place each aperture as described (4 refs first, then the target last)
2) Right-click or press <Enter> to process the photometry for the first image and advance to the next image
3) Left-click on the object/star corresponding to aperture C1 in the new image (C2-T5 apertures will also be placed)
4) If the T5 aperture misses the moving target, simply press the left mouse button inside T5 (don't release it) and drag the aperture to the target object and release the mouse button. If centroid is on, the aperture will centroid on the target. If the moving object is near another object that causes centroid to incorrectly center the aperture, turn centroid off for this image by <Alt>-left-clicking in the target aperture and dragging the aperture to the precise desired location by hand. Centroid can be turned back on in later images by again <Alt>-left-clicking in the aperture.
5) Right-click or press <Enter> to process the image and advance to the next image
6) Repeat steps 3-5 until you reach the end of the image sequence
To terminate the measurements before reaching the end of the image sequence, press <ESC>.
URL: http://astroimagej.170.s1.nabble.com/Perform-differential-photometry-on-an-object-moving-across-a-field-tp240p241.html
To allow control over the placement of the apertures between images in a time series, Multi-Aperture (MA) single-step mode must be used.
First a little background on the typical usage of single step mode: Single step mode allows the user to manually identify the location of the first aperture in a set of apertures with a left-click near the corresponding star in each new image. All of the other apertures are automatically placed at the same relative locations from the first aperture's location as recorded in the previous image. This capability handles cases when the images are not aligned as a result of poor telescope tracking or from slightly different telescope pointings in image sequences gathered over multiple nights. These "unaligned" image stacks can also be processed automatically if they have been plate solved by using the MA option "Use RA/DEC to locate aperture positions". However, the locate by RA/DEC feature should not be used when tracking a moving object since MA will attempt to place the aperture at the same RA/DEC location in all images and will result in the aperture not tracking the object.
Now back to how to manually perform differential photometry on a moving object: Open the image stack and start MA, which will display the setup panel shown below.
1) Make sure "Use RA/DEC to locate aperture positions" is deselected
2) Enable "Use single step mode..."
3) Enable "Allow aperture changes between slices..."
4) Optionally enable "Prompt to enter ref star mag..." if desired
5) Press "Place Apertures"
Using the 5 aperture example in the post above:
1) Place each aperture as described (4 refs first, then the target last)
2) Right-click or press <Enter> to process the photometry for the first image and advance to the next image
3) Left-click on the object/star corresponding to aperture C1 in the new image (C2-T5 apertures will also be placed)
4) If the T5 aperture misses the moving target, simply press the left mouse button inside T5 (don't release it) and drag the aperture to the target object and release the mouse button. If centroid is on, the aperture will centroid on the target. If the moving object is near another object that causes centroid to incorrectly center the aperture, turn centroid off for this image by <Alt>-left-clicking in the target aperture and dragging the aperture to the precise desired location by hand. Centroid can be turned back on in later images by again <Alt>-left-clicking in the aperture.
5) Right-click or press <Enter> to process the image and advance to the next image
6) Repeat steps 3-5 until you reach the end of the image sequence
To terminate the measurements before reaching the end of the image sequence, press <ESC>.
| Free forum by Nabble | Edit this page |