Problems with image alignment
|
Hi there!!, I´m using AstroImageJ to analyse images from DAWN Mission. For each zone I have 8 images using different filters...well, while the camera is changing the filter the spacecraft is still moving, for this reason the 8 images are displaced among themselves. To aling the images I´m using a manual method: I measure the coordinates of one pixel in one of the images and use it as a reference for the following images. Then measure again the coordinates of this pixel on the other images; finally when I know the differences I do: Process--->Shift Image Manually Do you know if there is a better and more precise method? And another question...when I have aligned all the images there are parts of some of them that appear in black because of the displacement. I would like to delete these "black parts" because I think they´re giving me some problems using READFITS on GDL. I use "Rectangular" to mark these regions and then use Image--->Crop. The problem is that after doing this the images come back to be displaced between them. Do you know how it could be solved and having the images centered and without "black parts"?... So sorry for being so noob using AstroImageJ and thanks a lot for your attention, Bernardo |
Re: Problems with image alignment
|
Administrator
|
Hi Bernardo,
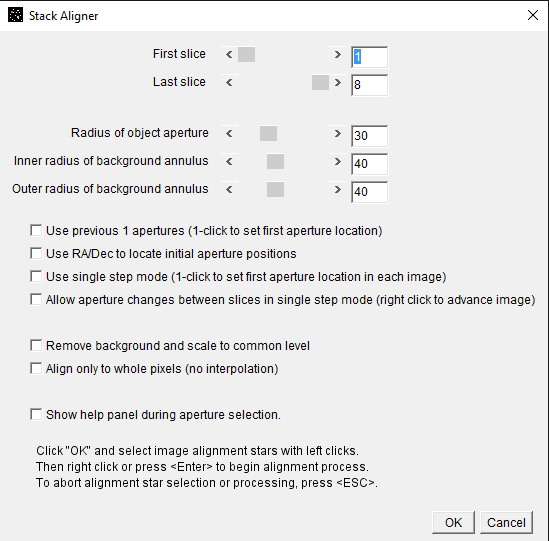
I assume your images do not have stars, so I think the best approach for you is to use the image stabilizer mode that can be found in the menus above an image stack. Make sure you have loaded your 8 images into a stack (use Toolbar->File->Import->Image Sequence) rather than loading them as 8 separate images. Then select Process->"Align stack using image stabilizer". Watch the lower part of the toolbar to see the progress so that you will know when it is finished (the process can be slow). This feature can do translation only or can attempt a full translation + rotation alignment (for that, select the affine mode option). If module does not work for some reason, an alternative is the image alignment module, which is best for star fields, but it may work for you if there is a bright feature in the image that an aperture can be placed around and centroided on. Access it using the stack aligner icon (  ) above the image display. There are three options available, and the best depends on how much image shift you have and whether or not your images have WCS headers (I assume
not in your case). I think option #3 below may be the best alternative for you. ) above the image display. There are three options available, and the best depends on how much image shift you have and whether or not your images have WCS headers (I assume
not in your case). I think option #3 below may be the best alternative for you.Alignment modes typically used for star fields (stack aligner): 1) If your images have WCS headers (i.e. have been plate solved either outside of AIJ or using AIJ), the easiest method is to choose the "Use only WCS headers for alignment" and then click okay. The images will then be aligned based on information in the FITS headers. 2) If your images do not have WCS headers (and you do not want to plate solve them), and if your image shift from one image to the next is less than the size of a (possibly large) aperture that can be placed around a relatively bright isolated star, then set the appropriate aperture size (similar to multiaperture), deselect all options (except maybe the "Align only to whole pixels.." and/or "Remove background ...", click OK, the click near one or more stars to place alignment apertures. When you are finished placing apertures, press <Enter> or right-click, then the images will align. 3) If your images shift more than apertures can track, you will need to use the same setup as #2, except enable the option "Use single step mode". After clicking OK in that mode, place one or more apertures around one or more stars in the first image. Then press <Enter> or right-click. Then when the image is aligned and the new image in the stack is displayed, click near the first star you clicked in the first image. Continue clicking on the same star until all images are aligned. NOTE: Image alignment using the stack aligner module is current limited to translation only (i.e. shifts in x or y only - no rotation or scaling correction is done). NOTE2: The black regions after an image has been shifted are unavoidable. If you want to crop those regions, you will need to crop the same region in all images of the stack. The crop option will crop all images in a stack, so that should work out correctly if you load your images as a stack rather than individual images. Hopefully one of the above options will work for you, Karen |
|
Thank you very much for answering so quickly :D
I´m having the following problem with the first option: Process->"Align stack using image stabilizer". When I try to do it, it looks that works properly, but when I want to save and then see the images separately (I need one by one centered to use READFITS and then compare the reflectance of each pixel) I don´t see them modified.... ....what am I doing wrong please? The same would happen cropping the images because I need having the samenumber of pixels in each image. Sorry for asking again and thank you very much for your patience. Bernardo |
Re: Problems with image alignment
|
Administrator
|
How are you saving the images after alignment and cropping? The easiest
way is to use the File->"Save Stack as Sequence..." option to save all of the images in the stack, not just the image currently being displayed from the stack. Karen |
|
Sorry again, I save as you say and it gives me 8 images (and not cropping yet, I´m aligning) and when I open them I see them displaced, not aligned....may be do I have to rotate also? Bernardo |
Re: Problems with image alignment
|
Administrator
|
The aligned images should be saved in the same way they show up in the
stack after alignment when you use the "Save Stack As Sequence" option. I just tried aligning and saving 10 images here, and then reopened, and the images are still aligned. I assume you are 100% sure you are opening the new saved image names and not the original images? I'm not sure what else could be going wrong. If you want to send me one set of the 8 images, I'll try it here. What AIJ version and OS are you using? Karen |
|
Im using windows 10 and the 64bit AstroImageJ latest version (I think :S...I downloaded it 2 months ago ) Please if you´re so kind could you send me printscreens of the process you do? Or could you tell me what´s your AIJ version. Specially I need to know how to crop the same region for all the images to be as accurate on GDL. I send you a 8 pack images and the printscreens of how Im doing the process. Thanks a lot Karena for your kindness, I don´t know how to thank you. Sorry because of my desperation. Bernardo         And then I open the images: (here I shoot on sreen 1 (1) (right image))  (here I shoot on sreen 2 (8) (left image))  And they have the same coordinates as the original images. 2016-08-18 12:25 GMT+02:00 karenacollins [via AstroImageJ] <[hidden email]>: The aligned images should be saved in the same way they show up in the |
Re: Problems with image alignment
|
Administrator
|
That is the same version I am using, so I don't think that is the problem. I loaded up your images on my end and processed them using the image stabilizer module. I could not find a set of parameters that would work to align the images. So, I don't think
your problem is the save and crop, rather I don't think the images are aligning in the first place.
After you run the stabilizer plugin, move through the images in the stack. I expect you will see that they are not aligned, since they are not on my end.
The image stabilizer plugin was included from the ImageJ plugin library, and I don't have much/any experience with the settings. If you can leave the images at the links you provided, I'll ask my colleague that uses the image stabilizer to see if he can
find settings that will result in a good alignment. It may take a day or so for him to get time to do that. I think one problem may be that the images have such a dramatic difference in exposure level from image to image (i.e., the image means are 7.1, 0.017,
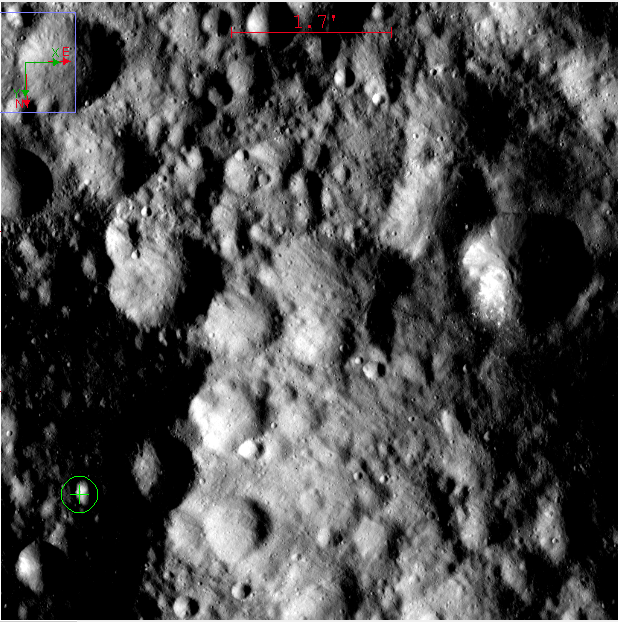
0.019, 0.0058, 0.0051, 0.0097, 0.0158, 0.0128, in images 1-8, respectively). In the mean time, I did get a reasonable alignment using the stack aligner, rather than the image stabilizer. There is a little residual rotation though. The aperture settings I used are: radius = 30 pixels
The I used a single aperture for alignment placed on the feature as shown here:
See if that works for you so that you can test cropping, saving, and reopening. I'll send an email to my colleague now, but I am finishing up my work "day" now and will not be back in the office for another 10-12 hours. Karen |
|
Hi again!! Here are the links to download the images: And links with the info of these images: I hope there is a solution... If there is a solution or not, I would like to say you thank you so much for your kindness, I´m really grateful!! :D Bernardo 2016-08-18 13:55 GMT+02:00 karenacollins [via AstroImageJ] <[hidden email]>:
|
Re: Problems with image alignment
|
Administrator
|
Hi Bernardo,
My Ph.D. adviser, John Kielkopf, has found a way to align the somewhat low contrast images you are working with. The trick is to use multiple passes of the two alignment methods offered by AIJ. The Image Stabilizer apparently does not work well with images that have a significant shift, but does do a good refining the alignment and cleaning up residual scaling and rotation differences. Here is the full procedure used to align your images. 1) Use Stack Aligner with an aperture around a bright feature that will allow centroiding. To do that, place an aperture of size 30-40-40 on a bright feature with dark surroundings like the one shown below at FITS location x=811, y=460. Press enter and let the aperture alignment run through the images. 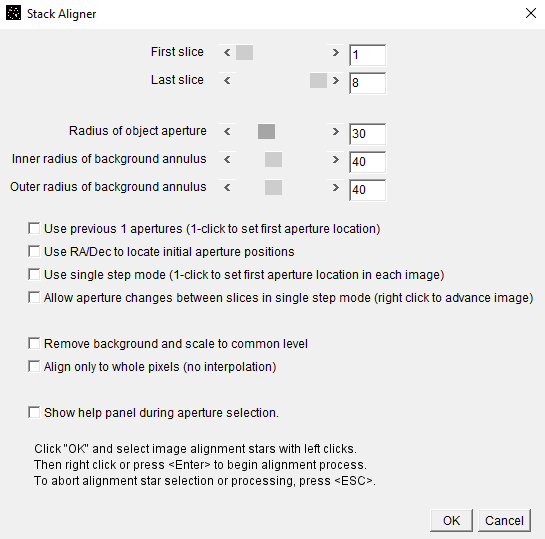 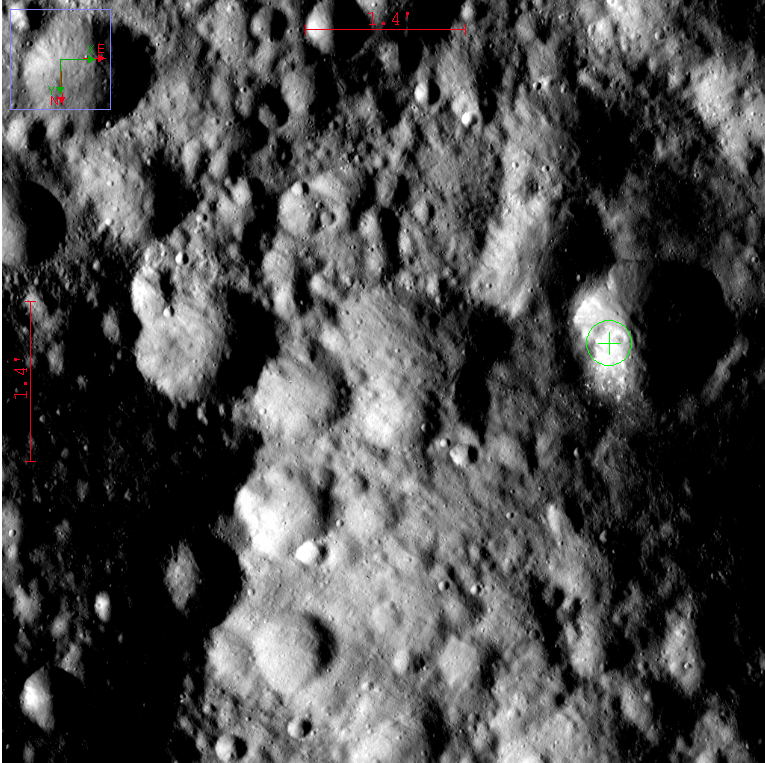 Scroll the stack to display the first image again. Repeat the stack aligner with a smaller aperture size such as 10-40-40 to refine the alignment (may not be necessary). Next display the image with the largest black borders that were created as a result of the alignment process. Use the rectangular ROI and place a box around the areas of the image so that you exclude the black regions. The black regions may affect the next step adversely. Scroll the stack back so that the first image is displayed again. ***Failure to do this may results in the first image being mangled.** Now run the image stabilizer with a all of the default settings, including "Translation" mode. Scroll through the stack to make the alignments look pretty close. 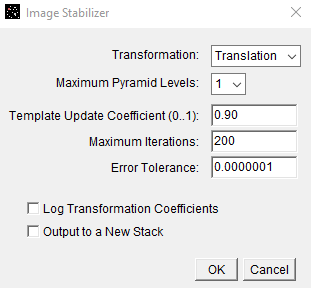 Starting with image 1 displayed, run the image stabilizer again . Select the "Affine" mode instead of the "Translation" mode to remove the residual rotation and scaling differences. You may also want to change "Max iterations" to a higher value such as 2000. This may take some time to finish. Watch the lower part of the toolbar to monitor progress. 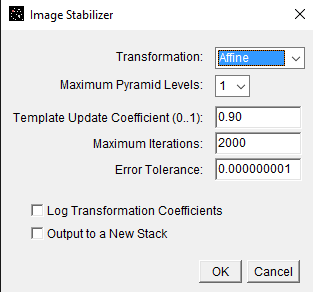 If the alignment is still off a bit, run the image stabilizer again in the "Affine" mode. Depending on the alignment accuracy required, you may have to repeat this step as needed. Crop the stack again if needed. Save the stack using File->Save stack as image sequence Hopefully that works for you! Karen |
Re: Problems with image alignment
|
Administrator
|
In reply to this post by Bernardo
Also, during the image stabilizer affine runs, it seems that changing
the default setting of "Template Update Coefficient" from 0.9 to 0.1 helps to resolve residual rotation and scaling differences. |
| Free forum by Nabble | Edit this page |


