Install AIJ with 64 bit Java (On Windows Machines, 64 bit OS and 64 bit Java are Strongly Recommended)

Install AIJ with 64 bit Java (On Windows Machines, 64 bit OS and 64 bit Java are Strongly Recommended)

Administrator
|
This post was updated on .
Many problems have been reported by Windows users attempting to run AstroImageJ with 32-bit Java. These problems are likely due to the very limited memory space available for running AIJ under 32-bit Java. Therefore, it is strongly recommended to run AIJ under a Windows 64-bit OS and 64-bit Java. To run AIJ with 64-bit Java requires some extra steps during installation since AstroImageJ.exe defaults to 32-bit Java, even if 64-bit Java has been installed.
***UPDATE: A Windows x64 installation package is now available that includes a Java 64-bit runtime package.*** If that package is downloaded and installed, AIJ will default to 64-bit operation after installation. If you prefer to use a 64-bit version of Java installed separately on your machine, please follow the instructions below. STEP-BY-STEP INSTRUCTIONS TO INSTALL AIJ WITH SEPARATELY INSTALLED 64-bit JAVA: You likely already have 32-bit Java installed on your Windows computer, but you will probably need to install 64-bit Java. The two can coexist on the same machine. Download and install from here as needed: http://www.java.com/en/download/faq/java_win64bit.xml NOTE: record the path name to the 64-bit Java installation directory. You will need it below. Install AIJ by downloading the latest windows installation file from the AIJ website here: http://www.astro.louisville.edu/software/astroimagej/ To install AIJ, unzip the downloaded file into the directory of your choice (example: C:\Users\Karen\Documents). NOTE: YOU MUST HAVE WRITE ACCESS TO THE INSTALLATION DIRECTORY FOR AIJ TO RUN PROPERLY. CHOOSE AN INSTALLATION DIRECTORY FOR WHICH YOUR USER ACCOUNT HAS WRITE ACCESS. For example, install AIJ in a directory that you have write access to, such as "Documents" or "Desktop". NOTE: Windows 10 locks down the "\Program Files" directories by default and will not allow applications to write to those directories. AIJ requires write access for updates and settings, so it is strongly suggested to install outside of the "\Program Files" folders (such as the Documents folder). If you are a power windows user and know how to deal with security settings for folders, you can still install in the "\Program Files" folders, but you will need to allow write access to the installation folder and all subfolders. Using the above example, the installation directory will be C:\Users\Karen\Documents\AstroImageJ. Open Windows Explorer and navigate to your installation directory. If you prefer to remove the version of java downloaded with the installation package from your system, then remove the ..\AstroImageJ\jre directory and it's contents. Run AIJ by double-clicking AstroImageJ.exe. Do not open AIJ by double-clicking ij.jar. If a warning is displayed stating "The publisher could not be verified...", deselect "Always ask before opening this file" and click "Run". A message will open stating "The program will now be auto-configured". Click "OK". Another window will open stating that a configuration file named "AstroImageJ.cfg" has been created in your installation directory. Click "OK". AIJ will now open (probably in 32-bit mode). Close AIJ. Navigate to your installation directory and open the newly created AstroImageJ.cfg file with a text editor such as Microsoft Notepad or Wordpad. The text file should contain 3 lines similar to the ones shown below: ------------------------------------------------------ . C:\Program Files (x86)\Java\jre7\bin\javaw.exe -Xmx640m -cp ij.jar ij.ImageJ ------------------------------------------------------ The single "dot" is the first line. The second line points to your 32-bit Java installation. Using the path name to the 64-bit Java installation directory recorded above, modify the second line to point to the 64-bit Java installation. For the default installation location, you probably just need to remove " (x86)" on the second line. For this example, the new config file will contain the following 3 lines: ------------------------------------------------------ . C:\Program Files\Java\jre7\bin\javaw.exe -Xmx640m -cp ij.jar ij.ImageJ ------------------------------------------------------ Save the new text back to the file AstroImageJ.cfg. Reopen AIJ by double-clicking AstroImageJ.exe again. On the AstroImageJ toolbar, left-click in the area below the icons and verify that AIJ is now running 64-bit Java as shown in the screen shot below. 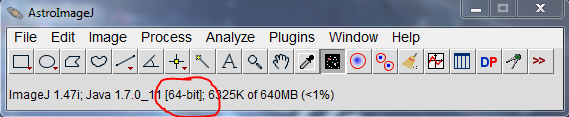 AIJ will still be using only 640 MB of memory. You should increase the amount of memory allocated to AIJ using AIJ_Toolbar->Edit->Options->Memory & Threads. Enter the amount of memory in MB that you want allocated to AIJ. It is recommended to NOT exceed 2/3 of the physical memory installed in your system. For example, if your machine has 8 GB of memory, enter a memory size up to ~5500 MB. Click "OK" and close AIJ. Reopen AIJ and you will now be running in 64-bit mode with the new memory setting. Click on the toolbar below the icons to verify that both settings are now being used. If your new memory setting is not being retained, or if you get an error message when you try to set the memory size, make sure you have installed AIJ in a location for which you have write access. Finally, upgrade to the latest version of AIJ by using the built-in update feature. Go to AIJ_Toolbar->Help->Update AstroImageJ. The "Upgrade To:" box will default to the latest version of AIJ. Click "OK" and three files will be downloaded and installed in the proper location in the installation directory structure (again, you need write access to the installation directory). After the files have been installed, AIJ will automatically close. Restart AIJ one more time and you will finally be running the updated version of AIJ under 64-bit Java and with the memory size you specified. DONE! NOTE: from now on, you will only need to double-click AstroImageJ.exe or a file with an extension associated with AstroImageJ.exe (see below) to open AIJ with all the new settings. ------------------------------------------------------------------------------------- TROUBLESHOOTING (most of the tips here are adapted from the ImageJ website): • AIJ does not start. -> Delete the AstroImageJ.cfg file in the AIJ installation directory. Repeat the above procedure to switch to 64-bit Java. • Cannot increase memory in Edit>Options>Memory & Threads. -> Install AIJ in a directory that you have write access to, such as "Documents" or "Desktop". • AIJ displays blank windows or windows filled with garbage. -> Update video card driver or try running the nVidia Fix plugin. • Multiple copies of AIJ are started when I open images by double clicking on them. -> Enable "Run single instance listener" in Edit>Options>Misc. • File extensions cannot be associated with AstroImageJ.exe. -> Download the "Default Programs Editor" utility from: http://defaultprogramseditor.com and use it to make the associations. Step-by-step instructions for using "Default Programs Editor.exe" to create file extension associations: ----------------------------------------------------------------------------------------------------------------- (1) double click on "Default Programs Editor.exe" to open it (2) click "File Type Settings" (3) click "Context Menu" (4) in the search box type the file type (.fits for example) you want to associate with AstroImageJ (by now you would have likely tried to associate the file type using built in windows tools, so it should be available in the list. If not, you may need to try using the windows tool first and assign the file type to any available program.) (5) click "Next" (6) click "Edit Selected Command..." (7) click "Browse" and navigate to AstroImageJ.exe in your installation directory (8) select AstroImageJ.exe and click "Open" (9) click "Next" (10) click "Save Context Menu" (11) click "OK" (12) click "Close" |
«
Return to AstroImageJ
|
1 view|%1 views
| Free forum by Nabble | Edit this page |