Best way to do 400+ stars on three images

Best way to do 400+ stars on three images

|
Background: I have 400+ target stars on which I need to do photometry. I have three images in different colors. I also have the WCS coordinates in RA and Dec for the target stars in a text file.
What is the most efficient method to accomplish this? Can AstroImageJ read in a coordinate text file and then do the photometry on each image (either individually or as a group)? If this this not possible, can I select the stars on the first image and then "tell" AstroImageJ to use the same stars on the other two images. I tried this with the "Multiple Aperture" option but it appears that default is to match the second and third images to the X,Y coordinates and not the WCS. The WCS do not match the X,Y coordinates as I go from one image to another. |
Re: Best way to do 400+ stars on three images
|
Administrator
|
Hi David,
The most straight-forward solution with the current feature set is to set up the apertures in one of the images by clicking on all 400 stars using Multi-Aperture (remember which star you click first, you will need it below). Once you have ran Multi-Aperture on that image, use the menus above the image to save the apertures (File->Save Apertures). You can now reload the apertures at any time by going to File->Open Apertures or by simply dragging and dropping the aperture file onto an image (filename must end in .aperture for the drag and drop to work). If you don't define new apertures in a second run of Multi-Aperture, the 400 apertures will be retained and restored automatically from one AIJ session to the next (but I would save them as described above in case something goes wrong or for future use). To use the previously entered (or reopened) apertures for another image, even if the images are not aligned, open the 2nd image, start another Multi-Aperture session, but enable the option "Use previous X apertures (1-click to set first aperture)" near the top of the Multi-Aperture set-up panel. You may change the aperture radius and other setting as needed, but the aperture locations will not be affected. Then click "OK" and then left-click on the first star that you clicked when first defining the 400 apertures. When you click on the first star, all 400 apertures will be placed with the same relative x,y pixel spacing from the first star as in the first image. This will work as long as there is no significant image rotation between the two images. If you prefer to load all three images in a stack, in the Multi-aperture setup panel, enable the option "Use single step mode..." near the top. This will allow you to click on the location of the first star in the aperture list for every image in the stack. Make sure you have "Show help panel during aperture selection" enabled to guide you through the single step process (a series of left and right mouse clicks). If you are truly resistant to clicking on the 400 stars one time, John Kielkopf has a utility (Python based I think) that will convert RA and DEC coordinates to x,y coordinates for images with WCS coordinates. It would require a little programming work to format the output from the utility to be compatible with the AIJ text-file-based .apertures file, but I think it would be fairly straight forward since the AIJ .apertures file format is very easy to determine by looking at a sample apertures file saved from AIJ. It doesn't help you much right now, but I will be adding the ability to open a list of apertures in RA,DEC file format in the next few months, but I don't have the bandwidth to add that feature right now. Karen On 6/20/2013 3:59 PM, David Emory [via
AstroImageJ] wrote:
Background: I have 400+ target stars on which I need to do photometry. I have three images in different colors. I also have the WCS coordinates in RA and Dec for the target stars in a text file. |
|
|
This post was updated on .
I know this thread is some years old, though I have a follow-up question on this topic.
I'd like to perform a very similar task: Select some hundreds of stars and create a Hertzsprung-Russell Diagram. Is there any way to create this directly? If not: Is there a way to use multi-aperture like described above, but to include all the selected stars in the measurement table? (measurements.xls) When I perform the procedure like described above only the first selected star is included. Normally, a star is included when added via shift+left-click. Or alternatively: How can I use a list with RA/Dec Coordinates to create the measurements.xls with all the stars I'd like to select? Any ideas on that? |
Re: Best way to do 400+ stars on three images
|
Administrator
|
There is a trick to produce a Hertzsprung-Russell diagram (H-R diagram) completely within AIJ. You first need exposures of a cluster in two different filters. It has been a while since I actually produced an H-R diagram in AIJ, but here is a sketch of how to do it. First, run multi-aperture photometry on the two images as usual. Then select Multi-Plot Main->Table->Transpose Table. Next remove all of the resulting rows that are not Source-Sky_Xnn values. Using the Multi-plot_Y-data "Function", "Y-data", and "Y-operand" setting, create the Filter A - Filter B color and plot that vs. one of the filter source counts. I could be forgetting an important step, but that should give you the general idea. If need have more detailed question, let me know.
Regarding your "If not:" question: Multi-aperture records all aperture measurements in the table, but they are all recorded on one line (generally most sensible format for time series photometry). The above "Transpose Table" instruction inverts the table so that each aperture measurement is on a separate row so that the flux of all stars can be plotted. Regarding your last question: You can provide a list of RA/Dec coordinates for all of the stars you want to measure. To see the required input format, define 3-4 apertures in a plate-solved image with WCS coordinates using multi-aperture, and press enter to perform the photometry. Those results are not important, but that last steps records the apertures in AIJ memory. Then go to Image_Display->File->"Export Apertures to RA/Dec list..." to create an example file. You can duplicate this file with one line for each star you want to measure. Then load the file using the Image_Display->File->"Import Apertures From RA/Dec list...". Now start multi-aperture and make sure "Use previous 'N' apertures" and "Use RA/Dec to locate apertures" is enabled. Press "Place Apertures" and then <enter> to start the photometric measurements. Here is an example of what the RA/Dec input file should look like: ------------------------------------------------------------- #RA in decimal or sexagesimal HOURS #Dec in decimal or sexagesimal DEGREES #Ref Star=0,1,missing (0=target star, 1=ref star, missing->first ap=target, others=ref) #Centroid=0,1,missing (0=do not centroid, 1=centroid, missing=centroid) #Apparent Magnitude or missing (value = apparent magnitude, or value > 99 or missing = no mag info) #Add one comma separated line per aperture in the following format: #RA, Dec, Ref Star, Centroid, Magnitude 06:30:31.870, +29:42:27.34, 1, 1, 99.999 06:30:32.781, +29:40:20.38, 0, 1, 99.999 06:30:22.613, +29:44:42.19, 0, 1, 99.999 06:30:00.055, +29:46:06.79, 0, 1, 99.999 06:29:48.332, +29:38:14.22, 0, 1, 99.999 Karen |
|
|
Thank you very much for your reply - this sound super awesome! Maybe you could help me a bit step by step and in return I could write a tutorial how to create a HRD!?
So far I did: #1: create an account at nova.astrometry.net to get a user key #2: opend my image (one filter) #3: pressed the astrometry button #4: inserted the astrometry.net user key and let the programm run #meanwhile: created a list with all the stars that could be in my picture based on coordinates #5: imported RA/Dec list #6: startet multi-aperture, ticked 'use previous apertures' and 'use RA/Dec to locate aperture position' #7: getting errors: I think some of the actual stars are to faint to be recognised by the software and therefore nothing can be found at those positions. Is there a way to have those errors simply ignored? |
Re: Best way to do 400+ stars on three images
|
Administrator
|
A step-by-step guide on how to build an HR diagram in AIJ would be great. Thanks if you are able to to that.
I think you are likely correct about the centroid error. It will fail if the algorithm fails to find a center of light in the aperture. There is an option on the multi-aperture setup panel called either "Halt processing on centroid error" or "Halt processing on WCS or centroid error", depending on the version of AIJ you are running. I think turning that off will solve your centroid error problem. Another approach would be to turn off the centroid setting in the input file for that aperture. To do that, change the next to last number on the line corresponding to that aperture in the input file from 1 to 0. |
|
|
In reply to this post by karenacollins
Thanks again for your reply! I managed to let the multi-aperture run through. The errors appear now when creating all the plots and windows, but I can finallize the star-selection. One step further, yay. :)
Now I'd like to create a HRD. Is there a way to remove all the rows from the table that are no Source-Sky_Xnn values? My table is about 16k rows long, which is slightly too long to do it manually. Is there a sort by label function implemented I could access anyhow? I tried to do it in Excel, but when I try to open the modified table from Multi-Plot Main -> File -> Open table from file I got two error messages: After clicking "ok" Is there an easy way to limit the table to the source-sky values only? Thanks again in advance for your great support and this awesome tool! |
Re: Best way to do 400+ stars on three images
|
Administrator
|
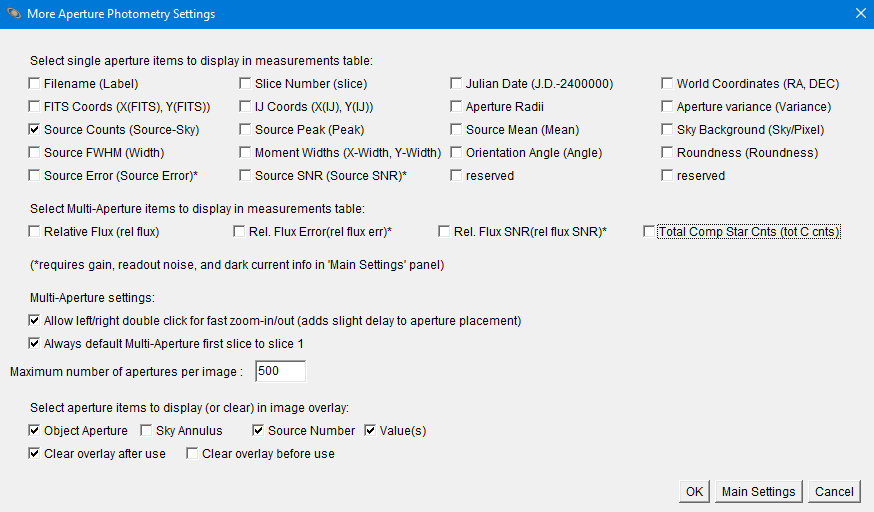
Unfortunately, there is no sort option within the AIJ measurement table capabilities, but your attempt to do it in excel should have worked. Make sure you save it as a tab-delimited file. That said, the best way is to disable all measurements except Source-Sky_Xnn, as you suggested. To do that, go to Aperture Settings, then click "More Settings", and then disable everything except "Source Counts", as shown below. Remember to turn those back on before attempting normal aperture photometry again.
|
|
|
I do not seem to be very lucky with this approach.
With everything disabled the table gets smaller, eventhoug I cannot deselect Source Peak (Peak) and the two reserved checkboxes. Even worse: the table won't transpose. After performing multi-aperture on two images I've got two lines in the measurments table. When I hit 'transpose currently selected table' in the Multi-plot Main windows, nothing happens. Thank you again for your great support! This is awesome! |
Re: Best way to do 400+ stars on three images
|
Administrator
|
Hi, would you mind sending your measurements table (before attempting to transpose) to karenacollins atatat outlook dotdotdot com so I can take a look at it on my end? Also, what is your computer platform and OS? When you say you can't deselect Source Peak and reserved, do you mean you click on those checkboxes and they will not uncheck? I think this is what you mean, but that behavior would be strange. Can you send me
a screen grab of those settings? Finally, click on the bottom of the toolbar and send me the screen grab. That should like something like this:
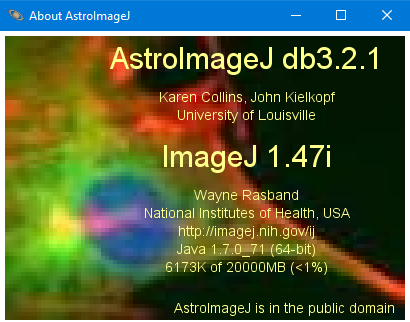
and then click Help->About AstroImageJ and send me that screen grab, something like this:
|

Re: Best way to do 400+ stars on three images
|
Administrator
|
In reply to this post by rjikyi
After reviewing the AIJ code, I realize that "Saturation Warning" and
"Linearity Warning" must be disabled by design at Set_Apertures->Main Settings before "Source Peak (Peak)" can be disabled. After those two options are disabled, go to "More Settings" and disabled "Source Peak (Peak)" and click OK. The Peak measurements are required to support the Saturation and Linearity and Warning functionality, so the peak option can not be disabled unless that two warnings are previously disabled. I have added a note in the GUI indicating the above on the "More Settings" page in the latest "daily build" update. You can download that version from the update server if you prefer, but the version you have works the same as long as you know you need to disable the two warnings before disabling "Peak". The "Reserved" settings are not currently used and do not affect the table, so those two settings remaining enabled should not cause a problem with creating a minimal table for HRD creation. The table you sent transposed as expected on my machine. I tried a few ways to break it, but couldn't find a method to make the transpose not work. I'll respond to your email and attach the transposed table I got. Maybe try clicking the table to select it just prior to selecting the Multiplot_Main->Table->"Transpose currently selected table". I'm not sure what else could be going wrong. If clicking the table just before issuing the command still doesn't work, can you please send me a step-by-step, click-by-click, list of how you are trying to transpose the table? Karen |
|
|
Hello Karen,
Sorry to uncover this old thread. I don't think this function was ever implemented in AIJ but, just in case, Is there any practical way to select automatically all possible sources in an image/serie of images (above a choosen SNR), so as to extract all photometry, in search for new variable stars in the observed field ? Thank you so much in advance, Christophe |
Re: Best way to do 400+ stars on three images
|
Administrator
|
In the current versions of AIJ, comp stars can automatically be selected based on min and max peak counts, and relative number of counts compared to the T1 star. While this is not exactly SNR, it should do what you want. Just set min some factor above your background noise and max below the saturation limit. For variable searches it probably doesn't matter if an aperture is labelled a comp or target, but you can easily convert them after photometry is run if needed.
Karen |
|
|
Hello Karen !
I see the process. It will most probably work. I will just need to add some automatic process to sort the best variable candidates using a spreadsheet. MAny thanks ! Christophe |
| Free forum by Nabble | Edit this page |