AstroImageJ version 5 installation and overview of new feature operation

AstroImageJ version 5 installation and overview of new feature operation

Administrator
|
This post was updated on .
AIJ version 5 has now been released. It is a a major new release, and requires a fresh install of AIJ. For Mac users that have had to deal with complex installation workarounds, AIJ v5 now installs on Mac and Windows with no special workarounds. The new Windows, Mac, and Linux AIJ v5 installation packages are available on the AIJ website.
On Windows, start AIJ by double-clicking the AstroImageJ.exe file (NOT the ij.jar file). On Mac, start AIJ by clicking the AstroImageJ app in the applications folder, or the link created on the desktop. After starting AstroImageJ, use the AstroImageJ Update feature at AstroImageJ_Toolbar > Help > Update AstroImageJ to install any recent updates. Optional: AstroImageJ defaults to allowing access to up to 75% of your physical system memory (part of your systems memory needs to be reserved for the operating system and simultaneously running other programs such as email, browsers, etc). It is not recommended to make more than 75% of system memory available to AstroImageJ (AstroImageJ will only use the amount of memory that it needs), but if you desire a smaller or larger custom memory setting, go to AIJ_Toolbar > Edit > Options > Memory & Threads and enter the amount of memory in MB that you want allocated to AIJ. For example, if your machine has 64 GB of memory, enter a memory size up to ~50000 MB. Click "OK" and close AIJ. When AIJ is restarted, you will be running with the new memory setting. A brief introduction to the major new features is provided here: -- All previous features and AIJ workflow continue to be supported, so you can adopt the new features at your own pace -- AIJ now directly opens TESScut files, TESS postage stamp sequences, TICA FFIs, and SPOC FFIs from MAST (drag and drop on AIJ toolbar), or TESS lightcurves into AIJ as a standard measurements table. -- AIJ now directly opens zipped fits.fz files as downloaded from the LCOGT archive (no unzipping or FUNPack decompression required, just drag and drop the single zip file on the AIJ toolbar) -- AIJ now offers automatic aperture size extraction -- AIJ now offers automatic comp star selection -- AIJ now offers bulk removal of outlier data points -- AIJ now offers automatic comp ensemble optimization through model residual RMS minimization -- AIJ now offers automatic detrend parameter selection according to BIC -- AIJ now offers automatic operation of the "Add Data" function at the end of the Multi-Aperture run to add new data columns such as BJD_TDB, airmass, etc -- Save plots in Publication Quality (vectorized) PDF file format -- Plus, many other detailed enhancements and improvements are included The new Multi-Aperture set-up panel looks like the first image below. New auto aperture radius options are now available: -- "Fixed Apertures as selected above" is the same mode that has always been available. This allows the user to manually specify the aperture radius and sky annulus settings. This is the best mode to use if there is another star very near the target star that is being measured. For best results in this case, choose an aperture radius that maximizes the flux from the target star while minimizing the flux from the nearby star. Note that the Fixed/Base aperture radii shown in the Multi-Aperture setup panel are used to perform the Auto Radial Profile and Auto FWHM, so they still need to be set to reasonable values for your images before running the auto aperture modes. --"Auto Fixed Apertures from first image T1 radial profile" measures the target star radial profile in only the first image in the stack and sets a fixed aperture radius for the entire stack such that it includes flux down to the fractional flux cutoff specified as determined from the first image only. This setting is useful for a quick assessment of a aperture size based only on the first image in the stack. If the FWHM in the first image is not representative of all images, the other modes may produce better photometric results. This mode will not produce good results if there is a second star in or near the target star photometric aperture. The default setting is 1% (or 0.01), which means pixels with flux down to 1% of the maximum radial profile bin value in the center of the aperture will be included in the aperture. Changing the cutoff to a smaller number such as 0.5% (0.005) will result in a larger aperture that includes a larger amount of the total flux. Changing the cutoff to a larger number will result in a smaller aperture. Once you find a good setting for your system that optimizes photometric precision, you will likely not need to adjust this setting for each photometry run. -- "Auto Fixed Apertures from multi-image T1 radial profiles" is the same as the previous mode, but it measures the target star radial profile of all images in the stack and includes flux down to the level fractional cutoff specified as determined from all images in the stack. This mode is better than the previous single image mode and is the overall preferred mode, but it can fail if WCS coordinates are used and they are incorrect in some images, or if WCS is not used and telescope guiding/tracking is poor. This mode will not produce good results if there is a second star in or near the photometric aperture. This option requires AIJ to step through the entire stack to measure an aperture size in each image, so will take longer than the previous mode. However, this extra time can be minimized by disabling "Update image display while running" at the bottom of the Multi-Aperture set-up panel. -- "Auto Variable Apertures from each image T1 radial profiles" is the same as the second option above, except a new aperture size is measured for each image. This mode may improve photometric precision if focus or seeing is changing dramatically throughout the image sequence. However, this mode may produce higher systematics than the fixed aperture modes above, so use it only if warranted by large PFS changes throughout the sequence. Do not use this mode if there is a nearby star since it will likely increase the amount of variable blended flux in the changing aperture size resulting in lower photometric precision. --"Auto Variable Apertures from each image T1 FWHM" is the same as the variable aperture option above, except the centroid function's estimate of FWHM is used to set the aperture size. The FWHM factor is multiplied by the estimated FWHM to determine the aperture radius in pixels. The estimation of FWHM from the centroid function is not a true measurement of FWHM, but values of the multiplier in the range of 1.0 to 1.5 seem to work well in most cases. For this option, a larger value of multiplier will result in a larger aperture radius. This mode is the same as the original variable aperture mode in AIJ v3 and is known to produce fairly reliable variable aperture measurements (the radial profile mode above can sometimes be more affected by image artifacts). The user may need to experiment with this mode and the radial profile mode to determine while is preferred for your instrumentation. As with the variable aperture radial profile mode, this mode may produce higher systematics than the fixed aperture modes, so use it only if warranted by large PFS changes throughout the sequence. Do not use this mode if there is a nearby star since it will likely increase the amount of variable blended flux in the changing aperture size resulting in lower photometric precision. The Auto Comparison Star option, will search the image for stars with similar brightness to the target star, and optionally closer to the target star. The main thing you will need to set up are the Max Comp Brightness % and Min Comp Brightness % that you want to allow, relative to the target star brightness. The useful range will depend on the quality of your detector, so some trial and error may be needed to find values that work well for your setup. Settings of Min = 50% and Max = 150% should be a good starting point for most set-ups, unless of course the target star is nearly saturated. High quality detectors such as the LCOGT SINISTRO cameras seem to tolerate a larger range, even as wide as 10% to 500%, if needed, and if the 500% is not too close to saturation. The Weight of brightness vs. distance (relative to the target star) lets you specify how much you want to emphasize proximity to the target star vs. closeness in brightness to the target star. It seems that 50% works pretty good for most purposes. I think you will find that using a Max Comps setting of 12 to 13 works well, since the comp star ensemble optimizer works through that number of comp stars in just a few seconds to a few 10s of seconds, depending on the number of cores in your computer (parallel processing is implemented to make use multiple processor cores). If a max number of comp stars are not found within the specified brightness range, fewer than the max comp stars will be placed. After the auto comps are placed, you can delete any that you don't want with a left click inside the aperture, or you can add to the comp stars manually. The Smoothing Filter Radius is the radius used to Gaussian smooth the image before searching for peaks. If too many peaks are being found, then the filter radius should be increased. Generally, the default 3.5 pixels works fine for most image sequences I have tried. To be clear, the smoothing and peak finding happens on an image copy that is not displayed, and most importantly doesn't affect the version of the image that is used for photometry. The Base Aperture, is the aperture number that is used when comparing brightness for comp star selection. Normally this would be set to "1" for T1, but if you are using more than one Target aperture, as in the case of an NEB check, then you may want to change the setting so that comps are selected based on the brightness in a different selected aperture. If Auto Thresholds (corresponding to peak values of maxima found) does not produce the expected comp stars, you may need to manually set the Max Peak and Min Peak values. Max should be set below saturation, but above the peak pixel value of the brightest star you might want considered as a comp star. For a typical 16 bit CCD, a max setting of 50,000 to 60,000 probably works well, unless your calibrated data are modified significantly by calibration (i.e. as is done by LCOGT, which multiplies the raw pixel values by the CCD gain). The Min value should be above the sky background, but below the faintest star peak pixel value you might want to consider as a comp star. Unless the images have very high sky background, a Min settings of 1000 - 3000 or so will probably work for bright star photometry. 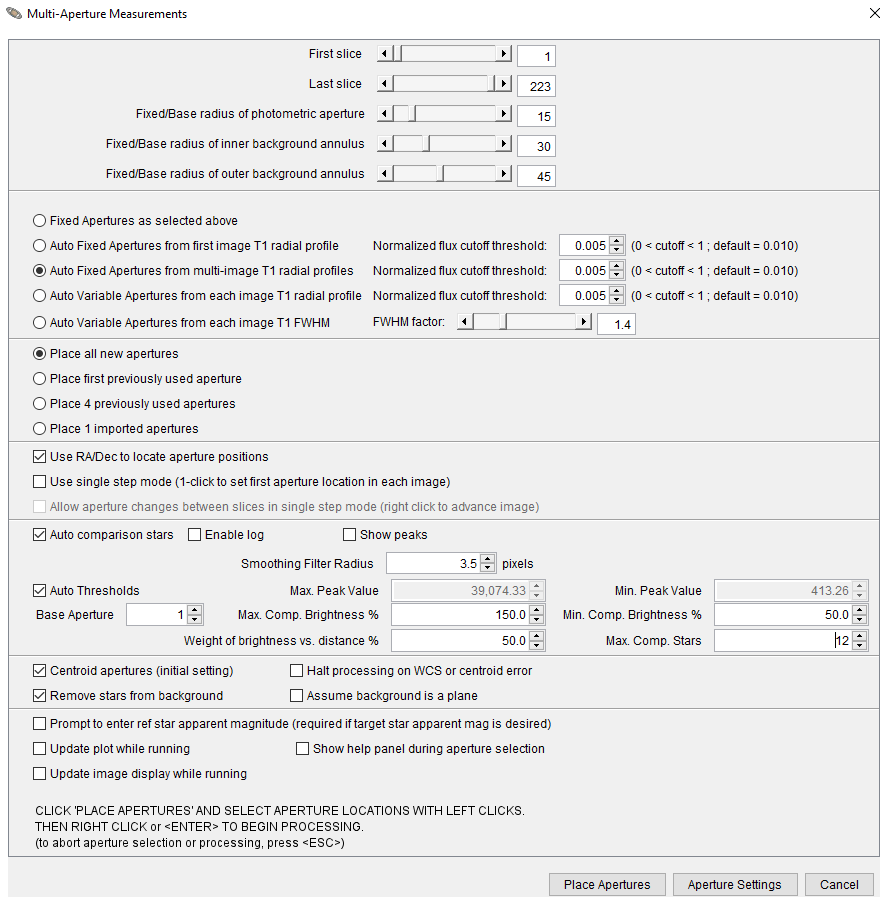
The New Data Auto Run function can be enabled by opening the New Data panel from the Multi-Aperture Main panel, set it up as desired, and then enable the "Auto" checkbox at the bottom of the panel. The specified values will then be updated at the end of every Multi-Aperture run. The New Data panel needs to remain open and the Auto option must be selected for the Auto operation to work. The other three major features are in the Data Fitting panels (as shown in the first image below). To use these, you'll need to set up an approximate transit model fit and include any fixed model parameters that you want from prior knowledge, such as from SPOC or QLP reports for TESS transits. Note that the fit can now be locked to an impact factor b, instead of inclination, if you prefer. 1a) Click Clean to remove any data points more than X-sigma from the transit model, where X can be set by the user in the box below the Clean button. A value of 4-5σ seems to work reasonably well for many cases. If the clean operation removed unexpected data points, the original data values can be restored by clicking the undo icon to the left of clean. The top box to the right of "Clean" shows the total number of data points that have been removed since the first clean. The bottom box shows the number of data points that have been removed (-), or restored with an undo (+) during the last clean or undo operation (successive clean and undo operations are allowed). 1b) Hold Shift and click Clean to remove any data points more than X times the RMS of the transit model residuals, where X can be set by the user in the box below the Clean button. A value of 3-4 times RMS seems to work reasonably well for many cases. The operation may need to be repeated a few times to iteratively remove more data points, since the RMS value will decrease each time an outlier is removed. RMS is the value reported in the corresponding fit panel's RMS box, and is the RMS value of the transit model data residuals (i.e. is calculated based on the difference between the fitted and detrended data points and the current transit model curve). 2) In the Comp Star Optimization sub-panel, click "Start" to find the comp star ensemble with the minimum RMS relative to the transit model. The comp stars that are considered are the apertures that are set as "C" apertures in the Reference Star Settings panel. Note the new "Save" option in the Ref Star panel. This option allows you to save a set of "C" stars that you may want to start the optimization over with several times. If you need to run optimization again, just select "Recall" to restore the desired master set of comp stars before starting optimize again. This allows multiple T stars to be set, and to disable specific "C" apertures, if they are known to be "bad", before starting optimization. 3) In the Detrend Parameter Optimization section, click start to automatically select the best detrending parameter(s) according to BIC. I recommend using a Max Detrend Pars setting of 1 detrend parameter for a partial or full transit light curve (or maybe two parameters if you have a full transit with good amount of out-of-transit baseline). I recommend leaving Min BIC Threshold set to the default value of 2 (which means a delta-BIC improvement of more than 2 is required per accepted detrend parameter). If fewer than the max detrend parameters are justified according to delta-BIC, fewer (or no) detrend parameters will be suggested. If you want to ensure very strong correlation before the optimizer accepts a detrend parameter, try setting the Min BIC Threshold to something like 10. The detrend parameters that will be considered are the ones that are displayed in the detrending section above the optimize subpanel (whether the parameter checkbox is selected or not). I recommend optimizing against the 7 detrend parameters shown in the second image below, but you can identify more or less potential detrending parameters according to your needs by changing the "Detrend Vars" setting near the top-middle of the Multi-Plot Main panel, and then selecting a parameter in the new detrend boxes that now show in the Fit Settings panel. If you no longer want to have a detrend parameter considered as part of an optimization, set the parameter selection to blank and/or reduce the number of max detrend parameters set on the Multi-plot Main panel. You may want to iterate between cleaning, comp star optimization, and detrend parameter optimization a couple of times to find the best combination. Be sure to "Recall" the full comp star set that you want to optimize against on each comp star optimization iteration. All detrend parameters that are shown will be used for repeated optimizations, even if the check box is not enabled. 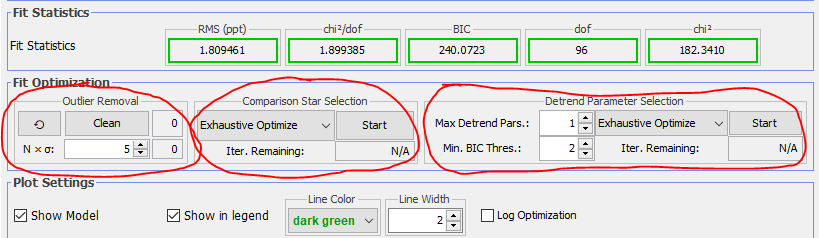

|
«
Return to AstroImageJ
|
1 view|%1 views
| Free forum by Nabble | Edit this page |